I've resolved to bike more to work, but I just had a teeny bike rack on the back—the kind that only attaches to the seat post, so no way to attach panniers (which are very expensive anyway!).
A friend suggested I bolt a milk crate onto the rack, but that seemed not the right dimensions for my cargo needs, and bike trunk bags didn't seem big enough as well as costly, so I resolved to look around for something that would suit me.
Voila! A wire "in" basket that I had dumpster dived from the library's trash bin (I already have two others). Perfect, and it even had a little cutaway to leave more room for the back of the seat.
The only question was how to attach it. Bolts, washers and nuts? Too clumsy-looking, and the open mesh on the bottom of the basket might make it difficult to find a washer big enough to hold the thing on.
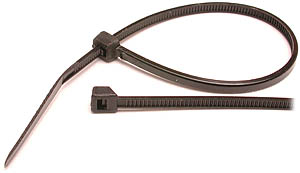
Plastic zip ties to the rescue. My local downtown hardware store sells them for seven cents apiece. In less than five minutes the basket was secured to the rack, AND I used another tie to put my red flasher on the back of the basket for better visibility. Another two ties solved another problem I was having—that the bike had no good place to put the mounting bracket for my frame pump. All that joy for fifty cents.
And here's the finished product, looking like it was actually meant to be attached to a bicycle:
And a detail shot showing the four zip ties holding the thing on:
I think the end result looks not too shabby; prettier than a milk crate, anyway. I'll take it on a road test when I go to work tomorrow.
Thursday, July 26, 2007
Tuesday, July 17, 2007
cold brew coffee in a canning jar
This post is near to my heart, because of three very important facts:
A quick internet search revealed the basic concept and water-to-coffee ratio (4 parts water to 1 part coffee). The idea is to stir together the (room temperature, filtered) water and coffee, let it sit for anywhere from 3 to 12 hours, then strain out the grounds.
Enter the wide-mouthed quart canning jar. I put in 3 cups of water, stirred in 3/4 cups of ground coffee (auto drip grind works just fine), covered it and let it sit for 12 hours.
I strained the grounds using a mesh plastic jar lid I had lying around for sprouting, and an ordinary coffee filter in a 6" wire mesh strainer. I poured through the mesh lid into the strainer, which was resting atop another container (to catch the rarefied liqueur of the gods).
The whole process took less than 5 minutes. Once strained, I kept the coffee concentrate in the refrigerator with a lid (to keep other foods from flavoring it or vice versa).
To use the resulting coffee concentrate, add it to a cup with boiling water (1 part coffee concentrate to 1 or 2 parts water). Or pour it cold over ice with 2 or 3 parts cold water for the smoothest iced coffee you've ever tasted.
It really tastes different from auto drip coffee, and is much smoother. I love cream in my coffee, and the cold-brewed stuff really doesn't need it at all. I've used my favorite beans from a local roaster and good old Maxwell House decaf, and they are both improved by the cold brewing process, but the fresh-roasted stuff is far superior to the Maxwell House.
The upsides to canning-jar cold brewing (as opposed to auto drip hot brewing):
- I love really good coffee.
- I enjoy gadgets.
- I am, ahem, somewhat frugal in nature.
A quick internet search revealed the basic concept and water-to-coffee ratio (4 parts water to 1 part coffee). The idea is to stir together the (room temperature, filtered) water and coffee, let it sit for anywhere from 3 to 12 hours, then strain out the grounds.
Enter the wide-mouthed quart canning jar. I put in 3 cups of water, stirred in 3/4 cups of ground coffee (auto drip grind works just fine), covered it and let it sit for 12 hours.
I strained the grounds using a mesh plastic jar lid I had lying around for sprouting, and an ordinary coffee filter in a 6" wire mesh strainer. I poured through the mesh lid into the strainer, which was resting atop another container (to catch the rarefied liqueur of the gods).
The whole process took less than 5 minutes. Once strained, I kept the coffee concentrate in the refrigerator with a lid (to keep other foods from flavoring it or vice versa).
To use the resulting coffee concentrate, add it to a cup with boiling water (1 part coffee concentrate to 1 or 2 parts water). Or pour it cold over ice with 2 or 3 parts cold water for the smoothest iced coffee you've ever tasted.
It really tastes different from auto drip coffee, and is much smoother. I love cream in my coffee, and the cold-brewed stuff really doesn't need it at all. I've used my favorite beans from a local roaster and good old Maxwell House decaf, and they are both improved by the cold brewing process, but the fresh-roasted stuff is far superior to the Maxwell House.
The upsides to canning-jar cold brewing (as opposed to auto drip hot brewing):
- Uses no electricity
- Requires no special equipment
- Solo coffee drinkers (like me) can enjoy just one cup whenever they want
- The most rockin' iced coffee ever
- Actual prep time (minus the brewing time) is comparable to auto-drip brewing
- May use more ground coffee per cup than auto drip (it's hard to tell, because the end product is concentrated, so it depends on how much you want to dilute it to drink)
- You have to plan ahead several hours (3 hours minimum brewing time)
- It might be easier to make mass quantities via auto-drip (though you could use larger jars and strainers to make a big batch)
Monday, July 9, 2007
Power of 10 - Slow cadence weight training secrets revealed
I think maybe I should have named this blog the Human Guinea Pig Review, given that so many of the non-fiction/how-to books I read inspire me to shrug my shoulders and say, "What the heck, I'll try anything once."
So it is with Power of 10 - The Once a Week Slow Motion Fitness Book by Adam Zickerman. The book's been out since 2004, but I just checked it out the other week, having read a hint on a web site about slow-cadence weight lifting and wanting to give it a try.
I'm just back from my third session in twelve days (Zickerman encourages newbies to work out once every four days as they get the hang of things), and am feeling that familiar rubber-chicken feeling in my arms, legs, and stomach muscles that I got from the weight-lifting class I took with a former Marine, BUT it took less than half the time.
To early to tell yet what the results will be, but the workout is strenuous. You're supposed to keep at a particular exercise until your muscles fail - basically, until you can't push the weight any more. The first time I tried this, I could still push the weight with my muscles, but was getting a blinding headache and feeling as though I might pass out. So I decided that discretion was the better part of valor and took that as my sign to stop and move on to the next exercise.
This program might be better for people who are already fairly fit, and want to maintain that level of fitness without sacrificing hour after hour per week to the gym gods.
For me, I suspect I'll need to supplement this with some cardio sessions, at least at first. But the book gets bonus points for very explicitly explaining the exercises. Zickerman even shows the "cheating points" - places in a particular exercise where bad form can impede results. And his writing style is breezy and readable and substantially less annoying than the average perky aerobics instructor.
Subscribe to:
Posts (Atom)